SmartOS COAL on Linux KVM with Virt Manager
Posted by Dave Eddy on Feb 12 2019 - tags: techCOAL, or Cloud-on-a-Laptop, is an
easy way to run and test SmartOS and the Triton
Stack in a self-contained VM meant to be run
on a laptop. The sdc-headnode
repository makes a lot of assumptions when building a COAL image about using
VMWare for virtualization on an OS X laptop. However, with some modifications
it is possible to run COAL on Linux via KVM managed through virt-manager.
To get virt-manager setup and running on Void Linux, you can follow my guide
KVM Virtualization with virt-manager on Void
Linux.
Nested Virtualization (optional)
Before getting started with the COAL building process, you can choose to enable
nested virtualization if your hardware supports it. This is required if you
would like to run bhyve zones on your COAL setup. Note that this setup
assumes an Intel CPU.
You can check if your CPU supports nested virtualization by running:
$ grep ^flags /proc/cpuinfo | grep -c ' vmx '
8
If the number returned is greater than 0, then nested virtualization is supported. Create the following file:
/etc/modprobe.d/kvm-nested.conf
options kvm-intel nested=1
options kvm-intel enable_shadow_vmcs=1
options kvm-intel enable_apicv=1
options kvm-intel ept=1
You can either reboot the machine here for good measure or remove and re-add the module to enable nested virtualization:
sudo modprobe -r kvm_intel
sudo modprobe -a kvm_intel
Finally, you can check to make sure it worked by running:
$ cat /sys/module/kvm_intel/parameters/nested
Y
It will return Y if nested virtualization is enabled.
Getting Started
You’ll need some external tools to build a COAL image. On Void Linux these can be installed with:
sudo vpm i git nodejs parted ksh
To get started, pull the sdc-headnode source code:
git clone git://github.com/joyent/sdc-headnode.git
cd sdc-headnode
I use a custom build.spec.local file, as well as an answers.json file.
Feel free to modify these to fit your environment - I put what I consider the
fields that can be easily modified without issue at the top of the files. The
IP addresses and NIC mac addresses will be used later on.
build.spec.local
{
    "coal-memsize": 8192,

    "answer-file": "answers.json",
    "build-tgz": "false",
    "vmware_version": 7,
    "default-boot-option": 1,
    "clean-cache": true
}
answers.json
{
    "root_password": "root",
    "external_nic": "52:54:00:00:00:01",
    "external_ip": "10.88.88.200",
    "admin_nic": "52:54:00:00:00:00",
    "admin_ip": "10.99.99.7",

    "config_console": "vga",
    "skip_instructions": true,
    "simple_headers": true,
    "skip_final_confirm": true,
    "skip_edit_config": true,
    "datacenter_company_name": "Joyent",
    "region_name": "coal",
    "datacenter_name": "coal",
    "datacenter_location": "My Laptop",
    "admin_provisionable_start": "<default>",
    "admin_netmask": "255.255.255.0",
    "admin_gateway": "10.99.99.7",
    "setup_external_network": true,
    "external_vlan_id": "<default>",
    "external_provisionable_start": "<default>",
    "external_provisionable_end": "<default>",
    "external_netmask": "255.255.255.0",
    "external_gateway": "10.88.88.1",
    "headnode_default_gateway": "<default>",
    "dns_resolver1": "<default>",
    "dns_resolver2": "<default>",
    "dns_domain": "joyent.us",
    "dns_search": "joyent.us",
    "dhcp_range_end": "10.99.99.253",
    "ntp_host": "<default>",
    "admin_password": "joypass123",
    "api_password": "joypass123",
    "mail_to": "<default>",
    "mail_from": "<default>",
    "phonehome_automatic": "<default>",
    "update_channel": "release"
}
Again, take care when modifying any of these values because other values may have to be modified as a result (like an interfaces IP address and its gateway address).
Build COAL
With answers.json and build.spec.local in place, the next step is to build
a COAL image. This can be done simply by running make usb - I have a
small script that I use to do this.
The script will run make usb to build the USB image and then follow it up by
creating a symlink ~/vms/coal.img that points to the latest COAL image built:
do-make
#!/usr/bin/env bash
#
# stupidly simple script to make COAL and link it to an img file

export MANTA_NO_AUTH=1

img=~/vms/coal.img

make usb || exit

latest=(usb-master-*/*.img)
latest=${latest[-1]}

mkdir -p "${img%/*}"
ln -svf "$PWD/$latest" "$img"
Note that this script can be run any time to build a new COAL image, but it should be run when the COAL VM is not running:
$ ./do-make
...
sent 2,984,703,731 bytes  received 5,321 bytes  192,561,874.32 bytes/sec
total size is 2,983,956,095  speedup is 1.00
WARNING: Copying in answers.json, remove answer-file from build.spec* to disable.
==> Cleaning up
==> Creating usb-master-20190210T041835Z-gafc88889/
'/home/dave/vms/coal.img' -> '/home/dave/dev/sdc-headnode/usb-master-20190210T041835Z-gafc88889/usb-master-20190210T041835Z-gafc88889-4gb.img'
Every time do-make is run, a new USB image will be created. I also have a
small script called clean that can delete all old builds and keep the latest
X (2 by default):
clean
#!/usr/bin/env bash
#
# clean builds from sdc-headnode

# keep this number of the latest builds
keep=2

for f in boot usb; do
	arr=("$f"-*)
	len=${#arr[@]}
	if ((len > keep)); then
		((len -= keep))
		arr=("${arr[@]:0:len}")
	else
		continue
	fi

	for d in "${arr[@]}"; do
		[[ -n $d && -d $d ]] || continue
		echo "removing $d"
		rm -rf "$d"
	done
done
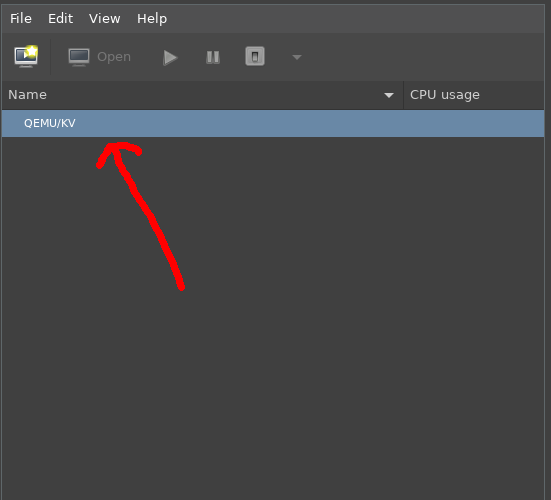
Setup Virtual Networks
COAL requires 2 networks to be setup: admin and external. To create these
networks, double-click the “QEMU/KV” section of the virt-manager GUI:
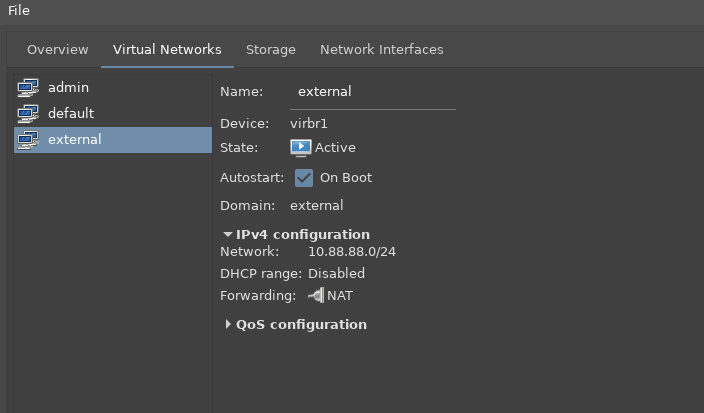
This will open an overview page. From there click the “Virtual Networks” tab and create 2 networks as follows.
Note that you may already have a default network created; this is ok and can
be left alone as we won’t be using it for COAL.
Create the external network with the following settings:
- Network:
10.88.88.0/24 - DHCP range:
disabled - Forwarding:
NAT
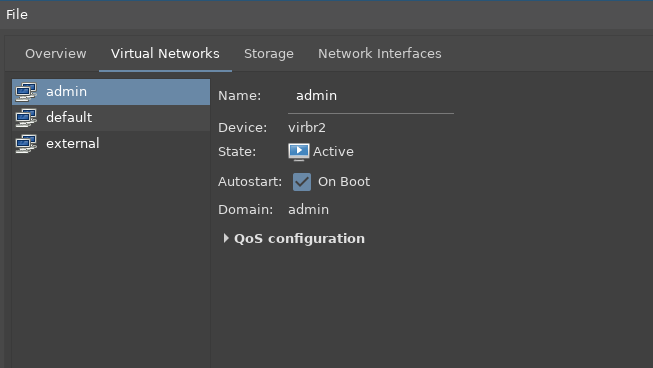
Create the admin network with no IP configuration whatsoever:
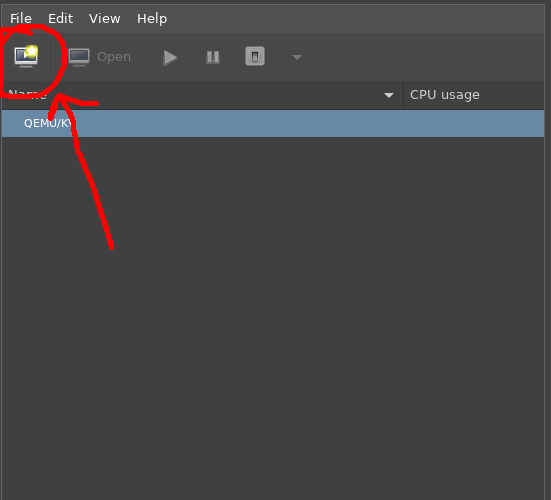
Create the VM
With the 2 virtual networks, the VM can now be created. To create the VM,
click the “new” button in virt-manager to open the wizard and start the
process:
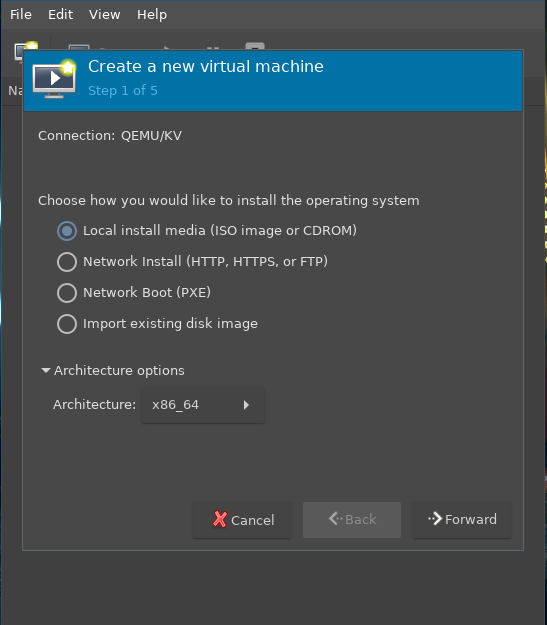
Step 1: Select “Local install media”. The architecture should be set to
x86_64 (this should be default):
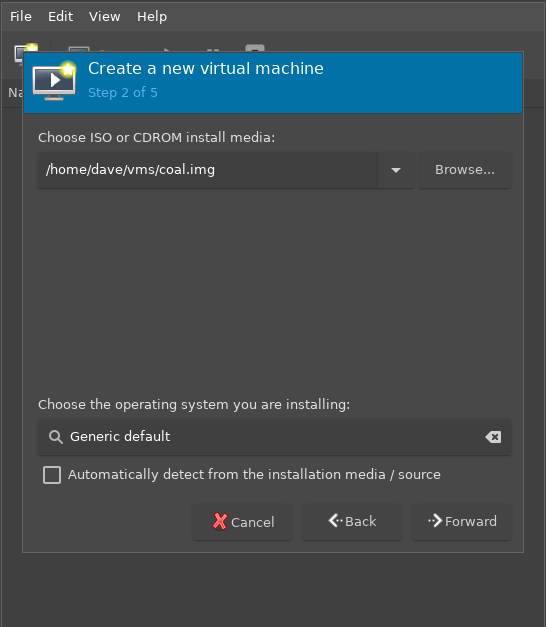
Step 2: Specify the location of the USB image created above, and set the OS to “Generic default”:
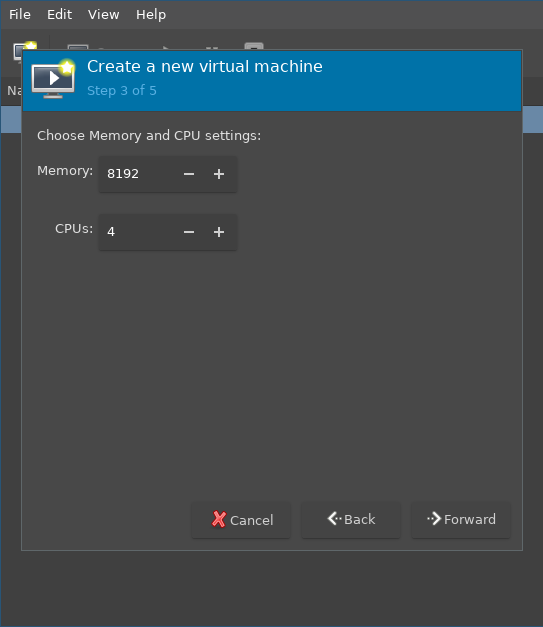
Step 3: Set the memory to 8192 (or the value specified in build.spec.local)
and the number of CPUs to 4 (or whatever you’d like):
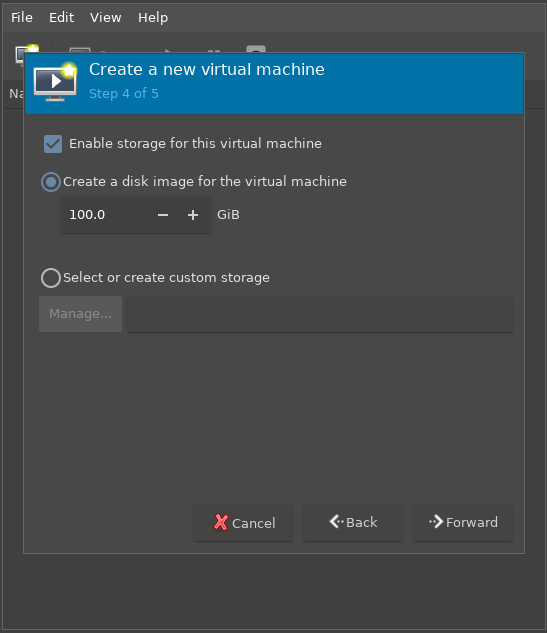
Step 4: Enable storage for the VM and create a disk (I personally use 100GiB just to make sure that running out of storage space isn’t an issue):
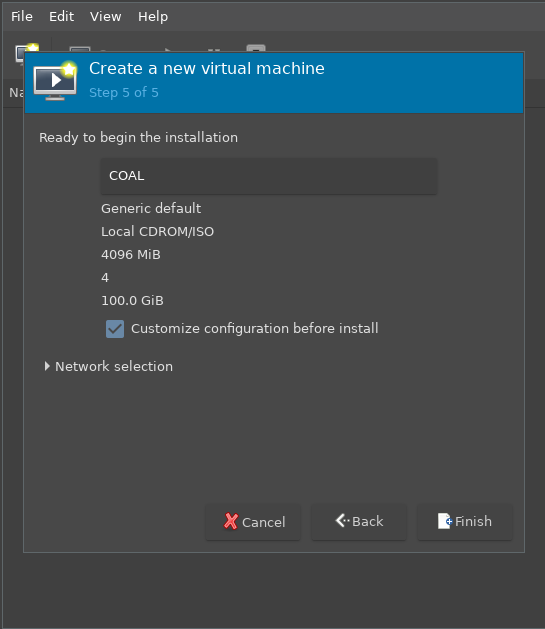
Step 5: Name the instance (I chose to call mine COAL), and tick “Customize configuration before install” - there are still some steps to finish before the VM is ready to run:
Customize the VM
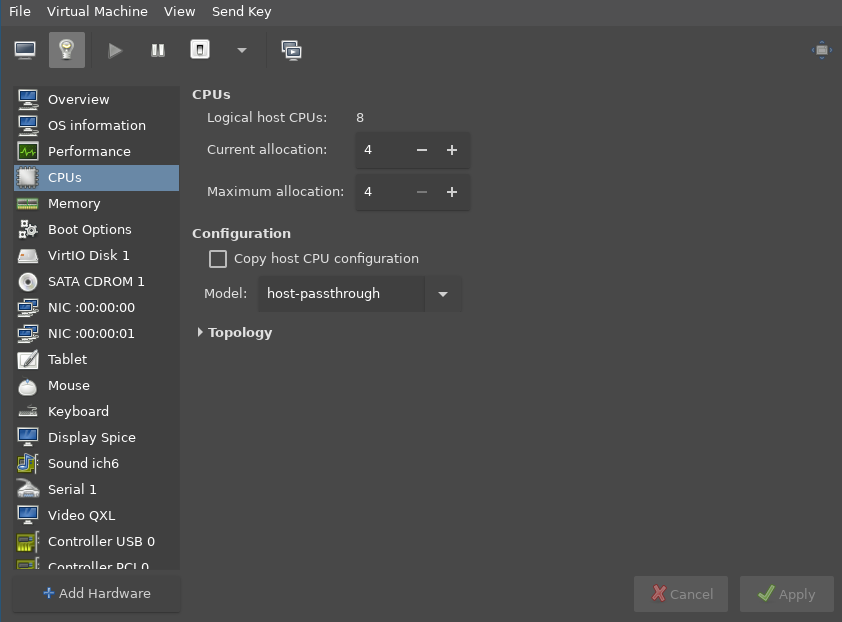
Configure CPU
If you’d like to have nested virtualization (assuming your hardware supports
it), set the CPU model to host-passthrough. This option will have to be
written in manually as it will not come up automatically or with autocomplete:
Configure Network
Click the “Add Hardware” button to add a second network device.
Create the admin NIC by setting the network source to “Virtual Network:
admin”, and set the MAC address to the value used in answers.json as
admin_nic:
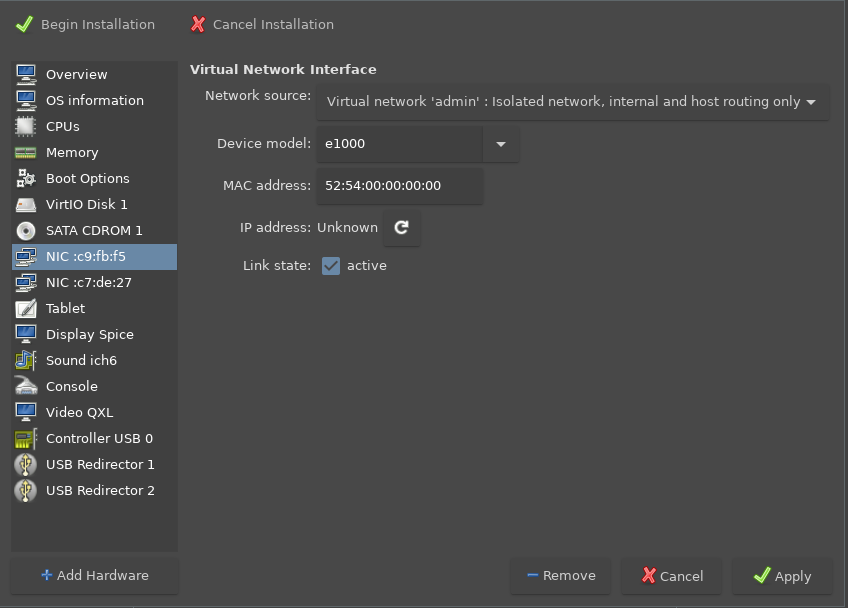
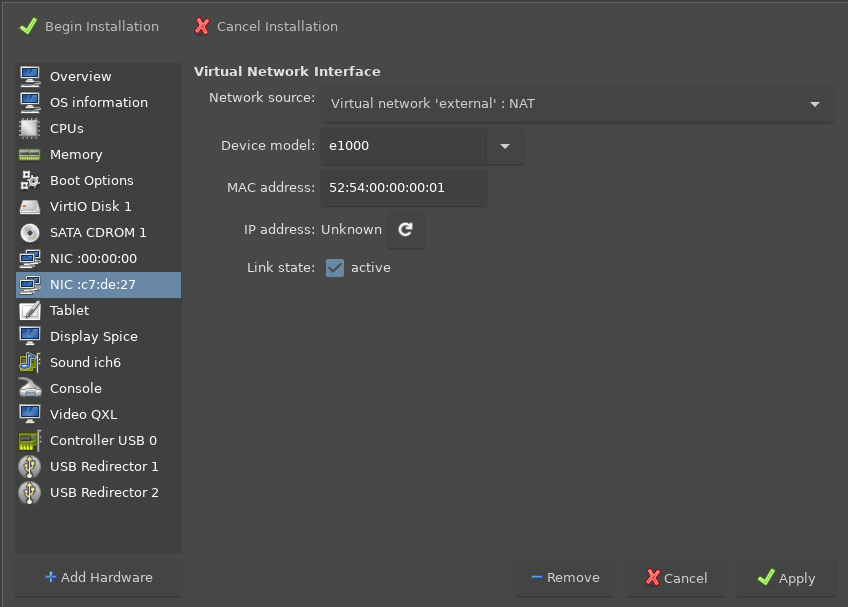
Create the external NIC by setting the network source to “Virtual Network:
external”, and set the MAC address to the value used in answers.json as
external_nic:
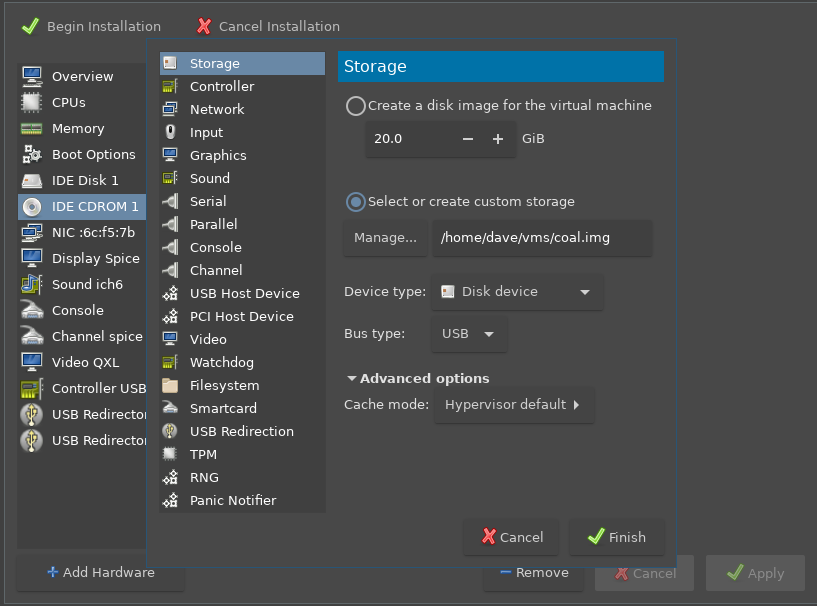
Configure USB
The USB image file will be setup as an “IDE CDROM” drive. Delete this device, and then click “Add Hardware” to add a new “Storage” device. Check the “Select or create custom storage” option and set the following parameters:
- Path:
~/vms/coal.img(or path wheredo-makelinked the latest image) - Device type:
Disk Device - Bus type:
USB
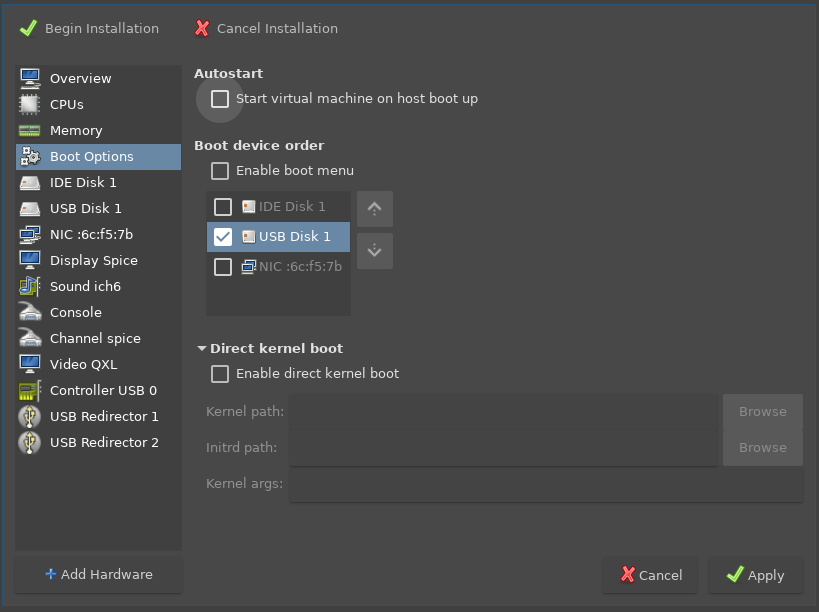
With the newly created USB device, go to the “Boot Options” section and make sure it is checked to be the only bootable device - this device contains the SmartOS image itself and will be used to boot the OS:
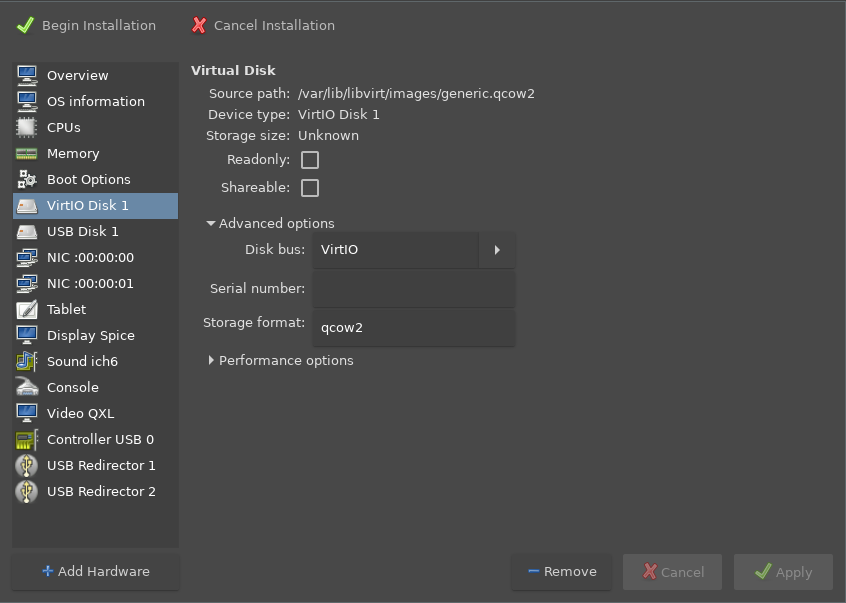
Configure IDE Disk
I’ve personally noticed that configuring the IDE disk to use the VirtIO Disk
bus has resulted in better performance in the VM. Click the IDE disk in the
configure window and change the “Disk bus” setting to VirtIO:
Boot the VM
Click the “Begin Installation” button at the top-left of the window to boot the VM and start the installation!
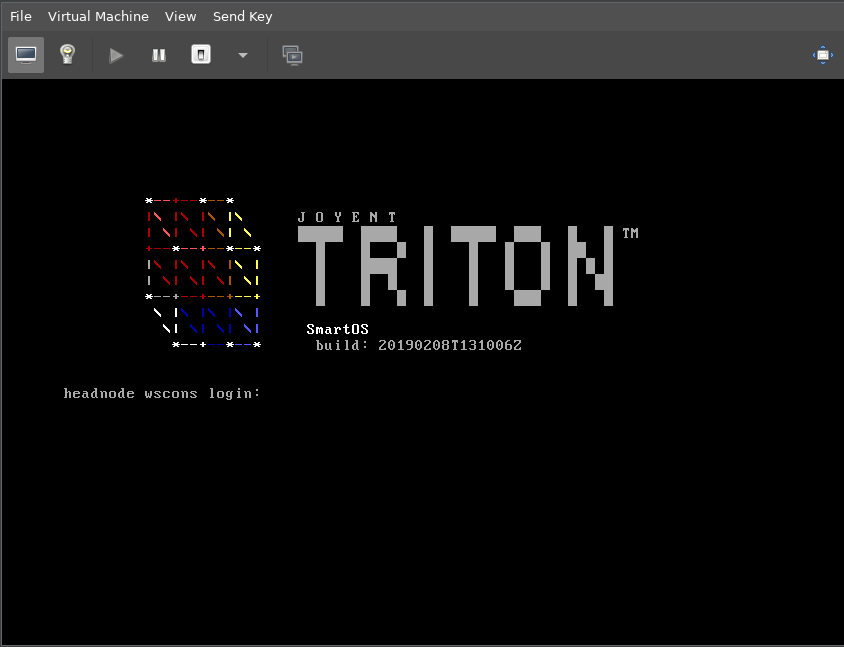
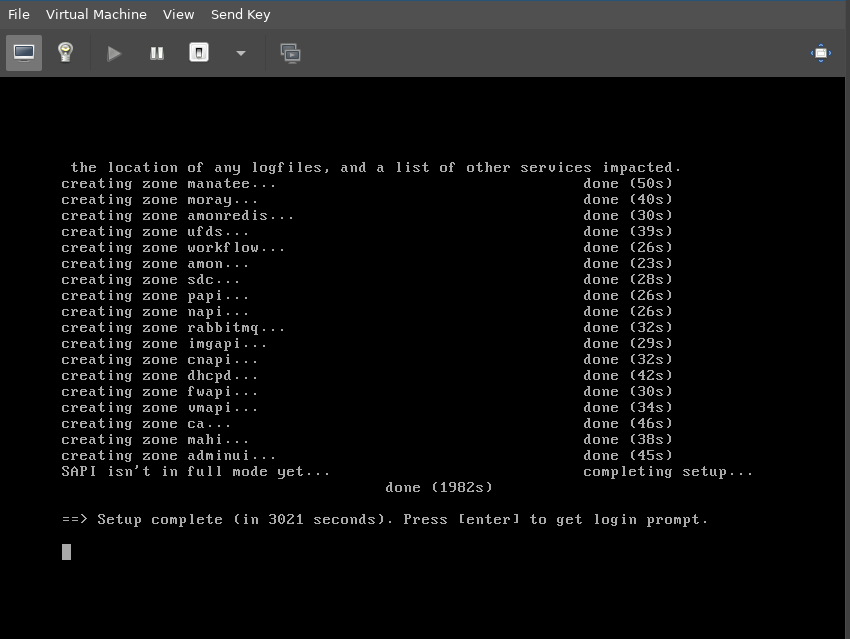
After the machine boots a lot of work will be done to finalize the install. The VM will reboot on its own during this process and then will provision every zone needed for COAL to function. A screen like this should appear on the console when it has finished installing:
Logging in
Once the setup has completed, the COAL instance is now ready to be used! To
login to the machine, you can add a section your ~/.ssh/config file for COAL:
~/.ssh/config
Host coal
	ServerAliveInterval 120
	User root
	Hostname 10.88.88.200
	ForwardAgent yes
	StrictHostKeyChecking no
	UserKnownHostsFile /dev/null
	ControlMaster no
Then, with this in place, login simply with ssh coal (the password is root
or whatever was set in answers.json):
$ ssh coal
Warning: Permanently added '10.88.88.200' (ECDSA) to the list of known hosts.
Password:
- SmartOS (build: 20190208T131006Z)
[root@headnode (coal) ~]#
You can get DC information with sdcadm:
[root@headnode (coal) ~]# sdcadm experimental info
Datacenter Company Name: Joyent
Datacenter Name: coal
Datacenter Location: My Laptop

Admin IP: 10.99.99.7
External IP: 10.88.88.200
DNS Domain: joyent.us
To check that nested virtualization worked as expected and that bhyve zones
can be provisioned, sysinfo can be checked for the Bhyve Capable property:
[root@headnode (coal) ~]# sysinfo | json 'Bhyve Capable'
true
Health checks can be run to verify that everything is working as expected:
[root@headnode (coal) ~]# sdc-healthcheck
ZONE                                 STATE           AGENT               STATUS
global                               running         -                   online
assets                               running         -                   online
sapi                                 running         -                   online
binder                               running         -                   online
manatee                              running         -                   online
moray                                running         -                   online
amonredis                            running         -                   online
ufds                                 running         -                   online
workflow                             running         -                   online
amon                                 running         -                   online
sdc                                  running         -                   online
papi                                 running         -                   online
napi                                 running         -                   online
rabbitmq                             running         -                   online
imgapi                               running         -                   online
cnapi                                running         -                   online
dhcpd                                running         -                   online
fwapi                                running         -                   online
vmapi                                running         -                   online
ca                                   running         -                   online
mahi                                 running         -                   online
adminui                              running         -                   online
global                               running         ur                  online
global                               running         smartlogin          online
And:
[root@headnode (coal) ~]# sdcadm health
INSTANCE                              SERVICE          HOSTNAME  ALIAS       HEALTHY
e3512f4b-47d0-42b4-b181-510c44631086  adminui          headnode  adminui0    true
4ba89fe1-739b-4689-b5be-2b106c8bab92  amon             headnode  amon0       true
7ed7e5cf-8867-4e7b-a882-57c2662c0487  amonredis        headnode  amonredis0  true
a4f91949-8427-4926-9933-2f0ffe18c5a5  assets           headnode  assets0     true
bf778a2c-1b65-4899-8b67-1314582bb484  binder           headnode  binder0     true
96a42299-d4da-4423-a1cd-75b0245bb0ed  ca               headnode  ca0         true
98f20bf8-796c-406c-9924-c16e9a40703d  cnapi            headnode  cnapi0      true
e00d35b2-9018-478d-85db-bfe944319a0a  dhcpd            headnode  dhcpd0      true
afaff931-d8b2-4173-94e2-3306dff79179  fwapi            headnode  fwapi0      true
b3ce95a5-a255-4b00-93c9-f3055d8471e4  imgapi           headnode  imgapi0     true
114bd1d3-e174-4585-9ab7-977260237c9d  mahi             headnode  mahi0       true
0e40cd43-4556-401c-85d8-98f766996cf3  manatee          headnode  manatee0    true
465a7ca3-5e17-4740-a0cb-f3f55089a7b0  moray            headnode  moray0      true
142a8178-d17b-43a4-bcf6-36968212041d  napi             headnode  napi0       true
847f96a2-f943-458f-9d71-892d1f273b15  papi             headnode  papi0       true
3d8d8c0a-33c1-4c8c-b95b-4143d829b795  rabbitmq         headnode  rabbitmq0   true
5ea05603-e4f3-4618-83c5-16f876293c39  sapi             headnode  sapi0       true
8071a1a6-f056-4e6d-8eac-e6ac7715f7d6  sdc              headnode  sdc0        true
05924e1d-4948-49d1-8e26-ceef20dc5118  ufds             headnode  ufds0       true
69c8427c-42b0-4c3c-94e8-dcc4509c2fa6  vmapi            headnode  vmapi0      true
15c34920-c423-4f52-87f8-12b6079cf0fa  workflow         headnode  workflow0   true
9ad2f41c-13c4-b541-bd60-0c6230916ed7  global           headnode  global      true
4b04c9ce-8776-482f-8655-4aaa2f56f417  amon-agent       headnode  -           true
40ed0710-f5be-4948-b057-b9b7326790a1  amon-relay       headnode  -           true
13e16c93-2568-4368-ab82-ff2d306d2fb8  cmon-agent       headnode  -           true
6bafb5d9-a931-4dc3-a649-4c71a1e91823  cn-agent         headnode  -           true
07214449-0e9e-431b-951e-27d6c697f527  config-agent     headnode  -           true
732f2d92-e67a-40d6-bfe5-f0edf66b16b0  firewaller       headnode  -           true
e355af90-5bc7-4d2e-8eb4-dd3009090c3f  hagfish-watcher  headnode  -           true
ca2a413b-58fb-4a5f-85ef-25aa7c9e36ab  net-agent        headnode  -           true
8062f7c5-9afe-42fa-ab6a-af28d2d35522  smartlogin       headnode  -           true
f0e74f08-ac1e-4952-8b38-624825d48196  vm-agent         headnode  -           true
And finally, the test suite can be run against the platform (note this will take a long time, but is useful for testing changes to the platform itself):
[root@headnode (coal) ~]# touch /lib/sdc/.sdc-test-no-production-data
[root@headnode (coal) ~]# /usr/vm/test/runtests
# Running /usr/vm/test/tests/test-50-creates.js
Added "imgapi" image source "https://images.joyent.com/"
...
Staying up-to-date
With the COAL VM powered down, the do-make script can be run at any time to
build a new COAL image with all of the latest agents and platform bits. After
that finishes and the USB image is linked, simply turn the VM back on to run
the latest version.
Also, I have the update-sdc script I use in the below section to keep an
image updated without having to rebuild the entire image.
Development and Tools
Everyone seems to have their own methods for working with COAL and SmartOS in general, myself included. I have created a bunch of tools along the way that have helped when developing on/for SmartOS.
update-sdc
This script is useful for updating sdc/triton on a COAL instance without having to rebuild the image.
All steps are based on the update documentation in the sdcadm repository:
- https://github.com/joyent/sdcadm/blob/master/docs/update.md
update-sdc
#!/usr/bin/env bash

set -o errexit

sdcadm() {
    echo "== sdcadm $* =="
    command sdcadm "$@"
}

sdcadm self-update --latest

sdcadm experimental update-gz-tools --latest --just-download
sdcadm experimental update-agents -y --latest --just-download --all

sdcadm dc-maint start

uuid=$(updates-imgadm list --latest name=agentsshar -o uuid -H)

[[ -n $uuid ]]

found=false
for f in /usbkey/extra/agents/*; do
	if [[ $f =~ $uuid ]]; then
		found=true
		break
	fi
done
if [[ $found == false ]]; then
	sdcadm experimental update-agents --latest --all --yes
fi

sdcadm experimental update-other
sdcadm experimental update-gz-tools --latest

sdcadm up -y --all --force-data-path -x sapi -x moray -x binder -x manatee
sdcadm up sapi -y
sdcadm up moray -y
sdcadm up binder -y
sdcadm up manatee -y

sdc-healthcheck
sdcadm health

sdcadm dc-maint stop
pull-latest-platform
This script will pull the latest compiled platform tarball from my build zone.
I will iterate in the smartos-live repo and often make changes to the
platform that need to be tested. This script, when ran on COAL, will reach out
to my build zone and pull the latest compiled tarball and install it. It’s not
the prettiest script, but for what it does it works and it makes development
very easy.
Swap out the latest variable to fit your environment:
pull-latest-platform
#!/usr/bin/env bash

dir='/var/tmp/platforms'
stamp=$(TZ=UTC date '+%Y%m%dT%H%M%SZ')
file=$dir/$stamp.tgz
latest='dave@10.0.1.29:joyent/smartos-live/output/platform-latest.tgz'

mkdir -p "$dir"
cd "$dir" || exit

echo "-- pulling latest from build to $stamp --"
scp -o StrictHostKeyChecking=no "$latest" "$file" || exit

echo '-- cleaning key --'
/usbkey/scripts/cleanup-key.sh

echo '-- installing --'
sdcadm platform install "$file"

echo '-- assigning --'
sdcadm platform assign "$stamp" --all
Conclusion
Having COAL on my laptop makes it really easy to test and develop on SmartOS with the latest code. My personal development cycle is fairly straight-forward:
- Build a COAL image using the above steps.
- Optionally compile a SmartOS platform.
- Boot the COAL image.
- Optionally install the compiled platform.
- Do whatever testing I need, then go back to step 1 or 3 depending on what I’m testing specifically.
Having COAL as easily on Linux as I do on OS X makes it simple to just focus on
the actual development and iterative process involved with that, as opposed to
worrying about getting the underlying system set up. virt-manager and the
virsh command make it easy to manage the lifecycle of the VM as well,
although normally I only need the ability to start and stop the VM.